Deep sanding scratches usually need a controlled grit progression rather than more pressure with the same paper. Learn how to identify the cause, remove the scratches, and avoid making them worse.
Grit scratches that will not sand out
Grit scratches that remain visible usually come from skipping grits, using worn or contaminated sandpaper, sanding unevenly, or applying a finish before the surface was uniformly smooth. The reliable fix is to return to the grit that can remove the deepest scratch, then move through progressively finer grits without skipping steps.
Identify what kind of scratch you have
Before sanding more, wipe the surface clean and inspect it under strong, angled light. A scratch may be:
A leftover scratch from a coarser grit: It often runs in a different direction or appears as a distinct line under the surrounding fine scratches.
A swirl pattern: Common after power sanding, especially when the pad, disc, or sanding motion is uneven.
A finish defect: A scratch may only appear after stain, paint, or clear coat highlights the surface.
A cut, dent, or gouge: If the mark has a sharp edge or changes the shape of the wood, fine sanding alone may not remove it efficiently.
Run a pencil lightly over the problem area. Sand until the pencil marks disappear evenly. If the scratch remains while the surrounding pencil marks vanish, you may need to step back to a coarser grit.
Use a controlled grit sequence
Do not jump directly from a very coarse abrasive to a fine one. Fine paper may polish the surrounding surface while leaving the deeper scratch behind.
A practical progression for many wood projects is:
Start with the coarsest grit needed to remove the actual defect.
Move to a medium grit once the scratch or uneven area is gone.
Finish with a finer grit appropriate for the coating, stain, or bare-wood surface.
For example, a deep scratch may require starting around 80 or 100 grit, followed by 120, 150, and then a finer finishing grit. The correct sequence depends on the wood species, coating, and finish instructions. Avoid skipping more than one commonly used grit step when removing visible scratches.
Make each new grit pass slightly beyond the area sanded with the previous grit. This blends the repair instead of leaving a visible low spot or sharp boundary.
Fine finishing abrasive for removing final sanding marks
Product prices and availability are accurate as of the date/time indicated and are subject to change. Any price and availability information displayed on Amazon.com at the time of purchase will apply to the purchase of this product.
Check the abrasive before sanding more
Sandpaper that is loaded with dust, paint, or finish can stop cutting cleanly. It may create uneven marks, drag across the surface, or force you to press harder.
Replace or clean the abrasive when:
The grit feels smooth or glazed.
Dust has filled the abrasive surface.
Paint, resin, or finish is stuck to the paper.
The paper has torn, curled, or lost its backing.
The sanding pattern becomes uneven.
Use the abrasive made for the job. Open-coat paper is often useful for wood because it leaves more space for dust, while a sanding sponge or flexible abrasive can conform better to profiles and edges. A paper-backed sheet or firm sanding block is usually easier to control on flat areas.
Hand sanding abrasive for flat surfaces and controlled repairs
Product prices and availability are accurate as of the date/time indicated and are subject to change. Any price and availability information displayed on Amazon.com at the time of purchase will apply to the purchase of this product.
Remove dust and loose debris
A stray grain of dust, a chip, or a piece of old abrasive can create a new deep scratch while you sand. Between grits, remove sanding dust with a vacuum or a clean, soft brush. Then inspect the surface again under angled light.
Do not drag a dirty sanding block or used disc across a freshly smoothed surface. If you are sanding between finish coats, follow the coating manufacturer's instructions for cleaning and drying before applying another coat.
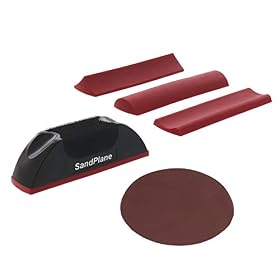
Flexible abrasive for edges, profiles, and detail work
Product prices and availability are accurate as of the date/time indicated and are subject to change. Any price and availability information displayed on Amazon.com at the time of purchase will apply to the purchase of this product.
Sand with the right motion and pressure
On bare wood, sand with the grain for the final passes. Cross-grain sanding can remove defects quickly, but it leaves marks that are difficult to hide with stain or clear finish.
Use light, consistent pressure. Excess pressure can:
Flatten or clog the abrasive.
Create uneven low spots.
Make a power sander cut more aggressively in one area.
Force a sanding disc or sheet to flex at the edge.
When using a random-orbit sander, keep the pad flat, allow the tool to reach its normal operating speed, and move it slowly without stopping in one spot. Do not tilt the tool onto its edge. With a sanding block, use long, even strokes and check frequently rather than sanding one mark aggressively.
Product prices and availability are accurate as of the date/time indicated and are subject to change. Any price and availability information displayed on Amazon.com at the time of purchase will apply to the purchase of this product.
Check edges, corners, and hard-to-reach areas
A power sander may smooth the center of a panel while leaving coarse scratches near edges or in corners. Conversely, concentrating on an edge can remove too much material and create a dip.
Use a hand sanding block or sanding sponge where the machine cannot reach. Keep the block flat on broad surfaces, and use a folded sheet only when the shape requires flexibility. Sanding by hand in a different direction from the machine can also make the remaining scratches easier to identify.
If the scratch appears after staining or finishing
Stain and clear finishes can make scratches much more visible because they collect pigment or reflect light differently. If the coating is already applied, do not immediately sand through it with a coarse abrasive.
First determine whether the defect is in the coating or in the wood beneath it:
Let the finish cure according to its instructions.
Inspect it under angled light.
If the mark is only in the coating, use the finish manufacturer's recommended rework method.
If the scratch reaches the wood, the finish may need to be removed locally or across the affected surface before repeating the grit sequence.
A test area in an inconspicuous location can reveal whether sanding, recoating, or stripping is the least damaging option.
When more sanding is not the best fix
A deep gouge, dent, veneer breakthrough, or uneven panel may not be repairable by simply using coarser paper. Coarse sanding can enlarge the damaged area or sand through a thin veneer.
Stop and reassess if:
The surface is veneered or has a thin factory coating.
The scratch remains after a proper grit progression.
The defect is below the surrounding surface.
You are removing a finish from a large area.
The surface becomes wavy or noticeably thinner.
For valuable furniture, veneer, cabinetry, or large refinishing work, a professional may be safer than continued abrasive removal. Replace the sandpaper when it is worn or contaminated; replace a sanding pad, backing plate, or block if it no longer holds the abrasive flat and securely.
FAQ
Why do sanding scratches show up after staining?
Stain collects in scratches and makes differences in scratch direction or depth more visible. Sand back through a controlled grit sequence, remove dust between grits, and finish with the grit recommended for the stain and wood.
Can fine sandpaper remove deep scratches?
Usually not efficiently. Fine paper tends to smooth the surrounding surface while leaving deeper marks. Step back to the coarsest grit that removes the scratch, then work through the finer grits without skipping too far.
Should I sand with or against the grain?
Use across-grain sanding only when necessary to remove a defect, and use progressively finer grits with the grain for the final passes on bare wood. Always follow the finish manufacturer's instructions for coated surfaces.
Why is my random-orbit sander leaving swirl marks?
Common causes include a worn or loaded disc, tilting the sander, pressing too hard, stopping in one place, or skipping grits. Keep the pad flat, use light pressure, replace clogged abrasives, and overlap each pass evenly.