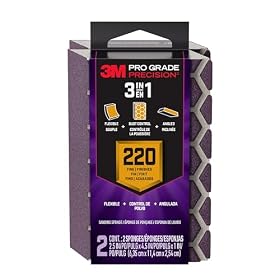
A sanding sponge conforms more easily than a flat sanding sheet, making it useful for rounded edges, routed profiles, trim, and other uneven surfaces. Choose the sponge shape, firmness, and grit based on the contour and finish you need.
Sanding sponge for contours
A sanding sponge is often the easiest way to smooth curved edges, rounded trim, routed profiles, and other contoured surfaces. Its flexible abrasive surface can make more consistent contact than a rigid sanding block, while the foam core helps it follow gentle curves without digging into the workpiece.
Why use a sanding sponge on contours?
Flat sandpaper works well on broad, flat faces, but it can crease, lift, or leave uneven pressure on a curve. A sanding sponge offers several advantages:
It conforms to gentle curves: The foam backing follows rounded edges and shallow profiles.
It is easier to grip: The sponge can be held directly without wrapping paper around a separate block.
It helps with edge sanding: A narrow sponge can reach trim edges and small transitions.
It can be rinsable: Some products are designed to be cleaned and reused; check the package before washing any abrasive.
It reduces accidental flat spots: A flexible sponge is less likely than a hard block to sand only the highest points of a curved surface.
A sponge is not a replacement for a rigid block everywhere. Use a firm block when you need to keep a flat panel perfectly flat, and use a detail sanding tool or folded paper when the profile is too tight for the sponge.
Choose the right sanding sponge
Match the grit to the job
Use the least aggressive grit that will remove the material you need to remove. Common choices include:
Coarse grit: For removing noticeable roughness, old finish, paint runs, or minor surface defects. Use light pressure on soft wood because coarse abrasive can leave deep scratches.
Medium grit: A practical starting point for smoothing wood after shaping, leveling minor imperfections, or preparing many painted surfaces.
Fine grit: For final smoothing, softening raised grain, and preparing a surface for paint or another finish.
Very fine grit: For delicate finish preparation or smoothing between compatible coats when the coating manufacturer allows sanding.
Grit labels and ranges vary by manufacturer, so compare products by the stated abrasive grade rather than assuming two unlabeled “medium” sponges are identical. When changing to a finer grit, sand until the previous scratches are removed rather than relying on a fixed number of passes.
Consider the sponge shape
Rectangular sponges are versatile for edges, broad curves, and general hand sanding.
Narrow or contoured sponges are better for trim, grooves, and smaller profiles.
Sponge pads with different abrasive faces can be useful when one project includes both flat edges and curved details.
Flexible sheets or foam-backed sheets may work better for large-radius curves where a thick sponge does not conform closely enough.
The abrasive face should be wide enough to contact the curve without folding. For a narrow molding profile, a large rectangular sponge may bridge over the recess instead of sanding it.
Choose firmness carefully
A firm sponge gives more control and removes material more efficiently. A softer sponge conforms better to uneven contours but may compress at high spots and sand them unevenly. For delicate trim or a shallow curve, moderate flexibility is usually more useful than maximum softness.
Product prices and availability are accurate as of the date/time indicated and are subject to change. Any price and availability information displayed on Amazon.com at the time of purchase will apply to the purchase of this product.
How to sand a curved surface evenly
Clean the surface. Remove dust, grease, loose paint, and debris that could clog the abrasive.
Start with a test area. Sand an inconspicuous section to confirm that the grit is not too aggressive.
Use light, even pressure. Let the abrasive do the cutting. Pressing hard can compress the sponge and create uneven wear.
Follow the shape. Move with the contour rather than forcing the sponge across it. On wood, sanding with the grain where practical helps reduce visible cross-scratches.
Keep the sponge moving. Repeatedly stopping in one spot can flatten a profile or create a low area.
Check often. Wipe away dust and inspect the surface under good lighting before moving to a finer grit.
Change grits gradually. A finer sponge should refine the scratches from the previous step, not compensate for deep scratches left by an overly coarse grit.
For painted or finished surfaces, avoid sanding through the coating unless removing it is the goal. On bare wood, be especially cautious near sharp transitions, end grain, and soft areas.
Product prices and availability are accurate as of the date/time indicated and are subject to change. Any price and availability information displayed on Amazon.com at the time of purchase will apply to the purchase of this product.
Sanding sponges for paint and refinishing
A sanding sponge can scuff a sound painted surface before recoating, smooth minor imperfections in primer, or soften a sharp edge where paint has built up. It is not suitable for every coating or repair condition.
Before sanding:
Confirm that the existing finish is sound and firmly attached.
Clean the surface according to the coating manufacturer’s instructions.
Use appropriate respiratory and eye protection when creating dust.
Avoid aggressive dry sanding of unknown older coatings; some existing paints may require specialized handling.
For between-coat sanding, use a fine or very fine abrasive and minimal pressure. The objective is usually to remove nibs and improve adhesion, not to strip the coating.
Product prices and availability are accurate as of the date/time indicated and are subject to change. Any price and availability information displayed on Amazon.com at the time of purchase will apply to the purchase of this product.
Common mistakes to avoid
Using a sponge that is too coarse
A coarse abrasive can leave scratches that remain visible under paint or clear finish. Start finer than you think necessary when working on a finished surface.
Pressing hard on a soft curve
Heavy pressure collapses the foam and concentrates abrasion on the highest spots. Use several light passes instead.
Forcing a thick sponge into a narrow groove
This can sand the edges while missing the bottom of the profile. Use a narrower sponge, a foam-backed abrasive, or folded sandpaper that fits the shape.
Using one sponge for every material
A sponge used on paint, filler, or resin can clog quickly when moved to bare wood. Keep abrasives separated by material and replace them when the surface is loaded or worn.
Assuming a washable sponge lasts indefinitely
Rinsing may remove dust from products designed for cleaning, but it does not restore worn abrasive. Let a cleaned sponge dry fully and discard it when it no longer cuts evenly.
When a sanding sponge is not the best choice
Use a rigid sanding block or sheet when the surface must remain flat. Use flexible abrasive paper when the contour is tight, complex, or too narrow for a sponge. For heavy stock removal, a powered detail sander or another appropriate tool may be more efficient, but follow the tool and finish manufacturer’s safety instructions.
Replace the sponge when the abrasive is visibly worn, clogged, torn, or no longer removes material evenly. If the surface has deep defects, loose coating, or a distorted profile, changing the grit will not correct the underlying problem; repair or reshape the surface first.
FAQ
What grit sanding sponge is best for curved wood trim?
A medium grit is a useful starting point for general smoothing, while fine grit is better for final preparation or a previously smooth surface. Start with the least aggressive grit that can accomplish the job.
Can I use a sanding sponge between coats of paint?
Yes, a fine or very fine sanding sponge can remove small dust nibs and lightly improve the next coat’s adhesion. Use light pressure, confirm that the coating is ready to sand, and follow the coating manufacturer’s instructions.
Is a sanding sponge better than sandpaper for contours?
It is often easier to control on gentle curves because the foam backing conforms to the surface. Flexible sandpaper or foam-backed sheets may be better for very tight profiles or narrow grooves.
How do I keep a sanding sponge from creating flat spots?
Use light pressure, keep the sponge moving, follow the contour, and inspect the surface frequently. A softer or more flexible sponge may help on broad curves, while a narrow sponge is better for small profiles.