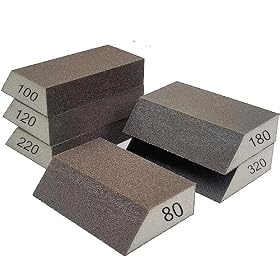
A useful sanding sponge set for primer and enamel should cover surface prep, between-coat smoothing, and final touch-ups without removing too much material. Here is how to choose the right grits, shapes, and abrasive types.
Sanding sponges are useful for smoothing primer, leveling small imperfections, and preparing enamel between coats. For most painting projects, choose a set that includes medium and fine grits—roughly 120 to 220 for ordinary prep, 320 to 400 for smoothing primer, and finer grits when the paint system calls for a very smooth finish. Avoid using a coarse sponge on a thin primer or finished enamel unless you are deliberately removing defects.
What to look for in a sanding sponge set
A useful grit range
A set is more practical when its grits are clearly labeled rather than relying only on color coding. The best range depends on the job:
Medium grit, approximately 100–150: Removes minor runs, rough wood fibers, and uneven filler. Use carefully because it can leave scratches that show through paint.
Fine grit, approximately 180–240: Smooths primer and prepares many painted surfaces for another coat.
Very fine grit, approximately 320–600: Used for delicate between-coat sanding, final smoothing, or reducing small surface imperfections without cutting aggressively.
Grit numbers are not always perfectly comparable across abrasive products, so follow the paint and primer manufacturer’s recommendations when they specify a preparation grade.
Flexible foam backing
A sanding sponge should conform slightly to the surface without collapsing immediately. Flexible foam works well on trim, profiled edges, and curved areas where a rigid sanding block may leave uneven pressure. A sponge that is too soft can round over sharp corners and remove more finish from edges than from the flat surface.
For large flat panels, a firmer sponge or sanding block generally provides better control. A flat sanding block helps keep pressure even and reduces the chance of creating shallow dips.
Abrasive on multiple sides
Many sponge abrasives can be used on more than one face. This is convenient for corners and detailed work, but check the product description before assuming every edge is abrasive. A sponge with an abrasive side and a plain handling side can be easier to grip and less likely to scratch adjacent areas.
Wet-or-dry compatibility
Some sanding sponges are designed for dry use only, while others can be used wet. Wet sanding can reduce airborne dust and is sometimes recommended for certain cured finishes, but water is not appropriate for every primer, substrate, or paint system. Do not wet-sand bare wood, water-sensitive filler, or uncured coatings unless the manufacturer permits it.
Which grits should you buy?
For a basic primer-and-enamel project, a set containing three or four grades is usually more useful than a large assortment with many nearly identical grits. A practical selection might include:
Around 120 or 150 grit for rough prep and localized defects.
Around 180 or 220 grit for leveling primer and smoothing repaired areas.
Around 320 or 400 grit for between-coat sanding and final surface refinement.
A finer grade, if needed, for a particularly smooth enamel finish or carefully specified polishing step.
Use the least aggressive grit that solves the problem. If primer is already smooth, jumping directly to a fine sponge is usually safer than starting with a coarse one.
Product prices and availability are accurate as of the date/time indicated and are subject to change. Any price and availability information displayed on Amazon.com at the time of purchase will apply to the purchase of this product.
Choosing a set for primer
Primer is normally sanded after it has dried or cured according to the label. Sanding removes dust nibs, light texture, brush marks, and minor unevenness. It should not expose large areas of the substrate.
For most primer work:
Start with a fine or medium-fine sponge when the surface only needs smoothing.
Use a medium grit locally on runs, filler edges, or rough patches.
Finish with a finer sponge to remove the previous abrasive scratches.
Wipe or vacuum away dust before applying enamel.
If sanding exposes the substrate, stop and reassess. The area may need another coat of primer rather than more sanding.
Product prices and availability are accurate as of the date/time indicated and are subject to change. Any price and availability information displayed on Amazon.com at the time of purchase will apply to the purchase of this product.
Choosing a set for enamel
Enamel can be more sensitive to scratches, edge burn-through, and incomplete curing. Before sanding, confirm the coating is dry enough for the process—not merely dry to the touch.
For between-coat work, use a fine or very fine sponge with light pressure. The goal is to remove dust and minor texture, not strip the coat. On a glossy cured surface, light abrasion may improve the next coat’s mechanical adhesion, but the paint manufacturer’s instructions take priority.
Do not aggressively sand enamel that is soft, gummy, or pulling from the surface. That usually indicates insufficient cure time, an incompatible coating, excessive film thickness, or an unsuitable substrate. Correct the cause before continuing.
Product prices and availability are accurate as of the date/time indicated and are subject to change. Any price and availability information displayed on Amazon.com at the time of purchase will apply to the purchase of this product.
Sponge shape and size matter
A set with different shapes can be more useful than one with many grit levels.
Flat rectangular sponges: Best for doors, trim faces, shelves, and other broad surfaces.
Thin sponges: Useful around narrow edges, grooves, and small details.
Contoured or angled sponges: Helpful for profiles and inside corners.
Small pieces: Convenient for spot repairs and reducing waste, but they can wear faster and provide less comfortable control.
For sharp painted edges, use light pressure and avoid repeatedly sanding directly across the edge. Sanding an edge can remove primer or enamel quickly.
Product prices and availability are accurate as of the date/time indicated and are subject to change. Any price and availability information displayed on Amazon.com at the time of purchase will apply to the purchase of this product.
How to use a sanding sponge between coats
Let the primer or enamel dry and cure as directed on its label.
Remove loose dust and inspect the surface under good lighting.
Choose the finest grit that can correct the visible defect.
Sand with light, even strokes rather than pressing hard in one location.
Use a clean section of the sponge as the abrasive loads with paint or dust.
Stop when the surface is uniformly smooth; do not keep sanding just to expose a perfectly bare-looking substrate.
Remove all residue with a suitable lint-free cloth, vacuum, or the cleaning method specified by the coating manufacturer.
Apply the next coat only when the surface is clean and ready.
On a broad flat area, use overlapping strokes and check the surface frequently. On corners and raised details, use very light pressure because the coating is often thinner there.
Common buying mistakes
Buying only coarse sponges
Coarse abrasives are useful for repair and removal, but they can leave scratches that remain visible under enamel. A set intended for painting should include fine grades.
Choosing by color alone
Abrasive colors vary by manufacturer. Check the printed grit number and whether the abrasive is intended for dry, wet, wood, paint, metal, or general-purpose use.
Using a soft sponge on a flat panel
A highly flexible sponge can follow surface irregularities instead of leveling them. Use a firmer block or flat sponge when maintaining a plane matters.
Reusing a loaded sponge
Paint and primer can clog the abrasive and cause uneven sanding. Clean or replace the sponge as directed. A worn sponge may polish rather than abrade, producing inconsistent results.
Sanding before the coating has cured
This can create smearing, peeling, or adhesion problems. Drying and recoating times vary with temperature, humidity, film thickness, and product chemistry.
When a sanding sponge set is the right choice
Sanding sponges are a good choice for trim, furniture, cabinets, small panels, curved surfaces, and between-coat touch-ups. They are less ideal for leveling large uneven surfaces, where a firm sanding block, sheet abrasive, or powered sander may provide more consistent support.
If a surface has deep damage, widespread peeling, or severe brush marks, do not expect a fine sponge to correct it quickly. Repair, scrape, strip, or re-prime as appropriate, following the coating manufacturer’s instructions. Replace the sponge set when the abrasive is visibly worn, clogged, torn, or no longer cuts evenly.
FAQ
What grit sanding sponge is best for sanding primer?
For most primer between-coat work, a fine sponge around 180 to 240 grit is a practical starting point. A finer grade around 320 to 400 may be better for a smooth final surface, while a coarser grade is reserved for localized defects or rough prep.
Can you sand enamel with a sanding sponge?
Yes, provided the enamel is sufficiently dry or cured and the product instructions allow sanding. Use a fine or very fine sponge with light pressure to avoid cutting through the coating.
Should sanding primer be wet or dry?
Either may be appropriate, depending on the primer, substrate, and instructions. Dry sanding is common for many wood and interior painting jobs. Wet sanding should only be used when the coating and substrate can safely tolerate moisture.
How do I keep a sanding sponge from scratching enamel?
Use a fine abrasive, wait for the enamel to cure, apply light pressure, and stop as soon as the surface is uniformly smooth. Clean away abrasive residue before recoating.