Stearated 220-grit sandpaper can be a useful between-coat abrasive because its coating helps reduce loading. Use it lightly on a fully dry varnish film, then remove all dust before recoating.
Stearated 220 for between varnish coats
Stearated 220-grit sandpaper is often a good choice for lightly scuffing a dry varnish coat before applying the next one. The 220 grit is fine enough to create a bonding surface without aggressively cutting through the finish, while the stearated coating helps reduce clogging from the varnish residue.
Use it for smoothing minor dust nibs, slight roughness, and raised fibers—not for leveling major runs, sags, or deep defects. Sand with light pressure, clean the surface thoroughly, and follow the varnish manufacturer's recoat instructions.
What “stearated 220” means
The 220 describes the abrasive grit. It is a relatively fine abrasive commonly used for final wood preparation and light between-coat sanding.
Stearated means the abrasive has a dry lubricant or anti-loading coating. This treatment can help keep finish residue from sticking to the paper as quickly. It is especially useful when scuffing a previously varnished surface, because ordinary paper may clog or leave hard deposits on the abrasive.
Stearated paper is not automatically better for every finish. The stearate residue can be undesirable under some coatings, particularly when the next finish is water-based or when the coating manufacturer specifically recommends a non-stearated abrasive.
When to use it between varnish coats
Use stearated 220 when:
The previous varnish coat is fully dry enough to sand according to its product instructions.
You need to remove small dust nibs or a slightly rough texture.
You want to dull the sheen and give the next coat a mechanical bonding surface.
The varnish instructions allow sanding between coats.
You can remove the sanding residue completely before recoating.
Between-coat sanding should be light. The goal is usually to uniformly dull the surface, not to expose bare wood. Sanding through at edges, corners, or profiles is easy, so use reduced pressure in those areas.
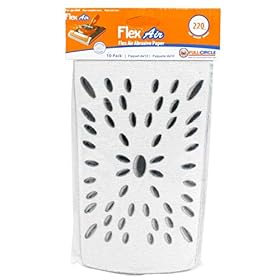
Stearated abrasive sheets for light finish sanding
Product prices and availability are accurate as of the date/time indicated and are subject to change. Any price and availability information displayed on Amazon.com at the time of purchase will apply to the purchase of this product.
When to avoid stearated paper
Choose a non-stearated abrasive instead, or follow the coating manufacturer's specific recommendation, when:
The next coat is water-based and the product instructions warn against stearated abrasives.
You are applying a finish that is sensitive to contamination or adhesion problems.
You cannot thoroughly remove the powder and residue.
The existing varnish is still soft, gummy, or prone to clogging the paper.
You are preparing a surface for a specialty coating with its own sanding requirements.
If the finish system calls for a particular abrasive type, that instruction takes priority over general sanding practice. When uncertain, try the complete process on a hidden or sample area before coating the visible work.
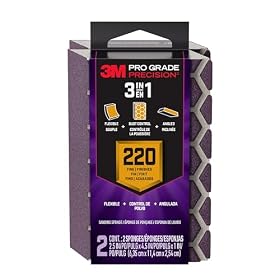
Non-stearated alternative for finish compatibility
Product prices and availability are accurate as of the date/time indicated and are subject to change. Any price and availability information displayed on Amazon.com at the time of purchase will apply to the purchase of this product.
How to sand between varnish coats with 220 grit
1. Let the varnish dry properly
Do not sand solely because the surface feels dry to the touch. Varnish may need additional time to harden enough for clean sanding. Temperature, humidity, film thickness, ventilation, and the specific product all affect drying and recoat time.
Follow the label. If the paper immediately gums up, the finish may be too soft to sand efficiently.
2. Inspect the surface
Look for dust nibs, rough fibers, brush marks, and areas that still appear glossy. If there is a large run, sag, or uneven buildup, 220 grit may not be the best first step. Allow the finish to harden, then address the defect carefully with an appropriate method rather than trying to force it flat with heavy pressure.
3. Sand with light, even strokes
Use a sanding block on broad flat areas so your fingers do not create uneven pressure. For routed edges, moldings, and profiles, use a flexible sanding sponge or folded paper without pressing hard.
Sand just enough to remove the unwanted roughness and reduce the shine. Keep the abrasive moving, and avoid concentrating on corners where it can cut through the finish.
For a clear finish, a uniformly dulled surface is a useful visual sign, but do not rely on appearance alone. Wipe or vacuum away dust before deciding whether more sanding is needed.
4. Remove all residue
Sanding creates both loose dust and possible stearate residue. Remove it using a method compatible with the varnish system, such as a clean vacuum and a lint-free cloth recommended by the finish manufacturer. Avoid leaving solvent, wax, oil, or tack-cloth residue unless the product instructions specifically approve it.
The surface should be clean and dry before recoating. If wiping reveals contamination or the surface feels oily, stop and determine the source rather than applying another coat over it.
5. Apply the next coat as directed
Do not assume that sanding between every coat is required. Some varnishes specify sanding only after a certain coat, within a recoat window, or only when the previous coat has exceeded that window. Follow the label instructions for the complete finish system.
Product prices and availability are accurate as of the date/time indicated and are subject to change. Any price and availability information displayed on Amazon.com at the time of purchase will apply to the purchase of this product.
Stearated 220 versus regular 220 grit
Both products can provide the same nominal grit size, but they behave differently during use:
Feature
Stearated 220
Non-stearated 220
Loading resistance
Usually better on some finish residues
May clog sooner on soft or resinous coatings
Residue concern
Requires attention to possible stearate contamination
Generally simpler when the finish specifies a clean, non-stearated abrasive
Typical use
Light scuffing and finish sanding when approved
General wood sanding and finish systems that prohibit stearated paper
Best choice
When the coating instructions allow it and reduced loading is useful
When compatibility and residue control are the priority
Grit number alone does not determine the result. The paper's backing, abrasive construction, coating, and how hard you press also affect scratch depth and loading.
Common problems and fixes
The paper clogs immediately
The varnish may not be hard enough to sand. Stop, clean the surface, and allow more drying time. Heavy pressure can also generate heat and make clogging worse. Use lighter strokes and replace the sheet when its cutting action drops.
The next varnish coat does not adhere well
Possible causes include sanding before the previous coat cured, leaving dust or stearate residue, applying over contamination, or using an incompatible finish system. Stop adding coats until the cause is identified. Consult the varnish manufacturer if adhesion is questionable.
Sanding exposes bare wood
Reduce pressure and use a block only where appropriate. Edges and corners need especially light contact. If you cut through the film, remove dust, inspect the area, and follow the finish manufacturer's repair and recoating guidance.
The surface still feels rough after sanding
Check whether the roughness is a deep defect, a raised grain issue, or dust left on the surface. Do not automatically switch to a much coarser abrasive between coats; coarse scratches may remain visible through the next clear layer. A cured run or significant unevenness may require a more deliberate leveling process.
Buying guidance
For between-coat work, look for clearly labeled 220-grit stearated sandpaper in a sheet or hand-sanding format. Sheets are practical for flat panels and can be folded or used with a block. A sanding sponge may be easier around profiles, but confirm its grit and use it gently so it does not round over details.
If the varnish instructions prohibit stearated abrasives, buy non-stearated 220-grit paper instead. If the finish is still soft or the defect is substantial, a different abrasive choice will not solve the underlying problem; more drying time or a repair step may be needed.
FAQ
Is stearated 220 grit good for sanding between varnish coats?
It can be a good choice for lightly scuffing a fully dry varnish coat because the stearated surface may resist loading. Use it only when the varnish manufacturer allows stearated abrasives, and remove all sanding residue before recoating.
Can I use stearated sandpaper before water-based varnish?
Sometimes, but do not assume it is compatible. Some finishers avoid stearated paper before water-based coatings because residue may affect adhesion. Follow the water-based varnish instructions and use non-stearated paper if recommended.
Should I sand through the varnish to the wood between coats?
Usually no. Between-coat sanding is normally a light scuffing step intended to smooth minor roughness and dull the surface for the next coat. Use a separate repair approach for runs, sags, or other major defects.
What should I do if 220 grit clogs with varnish?
Stop and check whether the varnish has dried and hardened for sanding. Allow more time if needed, use lighter pressure, and replace clogged paper. Persistent clogging can indicate that the finish is not ready to sand or that the finish system requires a different abrasive.