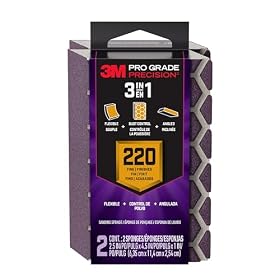
If sandpaper loads immediately on pine pitch, the abrasive is usually heating and picking up softened resin rather than cutting cleanly. Clean the surface, use fresh clog-resistant paper, reduce pressure and heat, and change abrasives as soon as the surface becomes glazed.
Sandpaper loads immediately on pine pitch because pine resin softens with friction and sticks to the abrasive grains. The quickest fix is to remove as much hardened pitch as possible, switch to fresh clog-resistant sandpaper, use lighter pressure, and keep the workpiece and abrasive from overheating.
Why pine pitch clogs sandpaper
Pine and other softwoods can contain resin pockets, especially around knots, sapwood, and pitch streaks. Sanding friction warms that resin until it becomes gummy. The pitch fills the spaces between abrasive grains, leaving a shiny, glazed surface that cuts poorly.
Several conditions make the problem worse:
Dull or previously loaded paper: A partially clogged sheet generates more heat and makes the resin stick faster.
Too much pressure: Pressing harder does not necessarily remove pitch faster. It increases heat and pushes softened resin into the abrasive.
Fine grit too early: Fine paper has smaller spaces between abrasive grains, so it can fill quickly on resinous wood.
High tool speed: A random-orbit sander or detail sander can heat pitch rapidly when run at high speed or held in one spot.
Sanding over a pitch pocket: A heavy resin deposit can load almost any paper until the deposit is removed separately.
Fix the surface before changing paper
Stop sanding when the paper starts leaving shiny streaks or stops cutting. Continuing with loaded abrasive usually adds heat without making useful progress.
Scrape off raised pitch. Use a sharp hand scraper or putty knife carefully held at a low angle. Avoid gouging the surrounding wood.
Let soft resin cool. If the pitch is warm and gummy, pause before scraping so it is less likely to smear.
Remove loose residue. Brush or vacuum the area after scraping. Do not blow dusty resin toward your face.
Check knots and pockets. Deep pitch may continue to emerge from a knot. Remove only what is practical without damaging the piece.
Do not sand over wet cleaner or solvent. If a manufacturer-approved cleaner is used, follow its label, provide ventilation, keep it away from ignition sources, and allow the surface to dry completely before sanding.
For a large, deep, or constantly bleeding pitch pocket, sanding may not be the best repair. A woodworker may need to remove the affected section, seal it with a compatible coating, or replace the piece depending on the project and finish.
Product prices and availability are accurate as of the date/time indicated and are subject to change. Any price and availability information displayed on Amazon.com at the time of purchase will apply to the purchase of this product.
Choose a less clog-prone abrasive
Use fresh paper rather than trying to rescue a sheet that is already glazed. Look for packaging that describes the abrasive as clog-resistant, load-resistant, or suitable for resinous wood. These products may use a coating or grain arrangement intended to leave more room for sanding debris, but no paper is immune to heavy pine pitch.
A practical grit approach is:
Start with a coarser grit appropriate to the work, only if you need to remove material or level the area.
Move to a medium grit after the pitch and uneven surface are under control.
Use fine grit for final smoothing, not for removing a fresh resin deposit.
Avoid jumping to an unnecessarily fine grit at the beginning. It can polish the pitch and clog faster instead of cutting through it.
The best format depends on the tool. Use hook-and-loop or pressure-sensitive discs that match the sander's diameter and hole pattern, or use sheets and sanding sponges for hand work. A backing pad that is worn, soft, or contaminated can also cause uneven sanding and extra heat.
Product prices and availability are accurate as of the date/time indicated and are subject to change. Any price and availability information displayed on Amazon.com at the time of purchase will apply to the purchase of this product.
Change your sanding technique
Once the surface is scraped and the abrasive is fresh, reduce the heat produced during sanding:
Use light, even pressure and let the abrasive do the cutting.
Keep the sander moving rather than holding it over a knot or pitch streak.
Use a moderate speed when your tool allows speed adjustment.
Make short passes, then inspect the paper and workpiece.
Replace the sheet or disc as soon as it becomes shiny and stops cutting.
Use dust extraction if compatible with the sander. Removing debris helps the abrasive cut more cleanly and can reduce heat buildup.
Sand with the tool's pad flat. Tilting an orbital sander concentrates pressure on a small area and can increase loading.
A sanding screen, abrasive cleaning stick, or similar abrasive-cleaning accessory may remove ordinary dust buildup from some sanding products. It may not remove sticky pine pitch reliably, and the accessory must be compatible with the abrasive and tool. Do not use a cleaning method that damages the backing or creates a safety hazard.
If the paper still loads immediately
Work through these checks:
Try a new sheet or disc. The existing abrasive may already be contaminated.
Test a slightly coarser grit. Fine paper can clog quickly on resinous areas.
Lower pressure and speed. Excess heat is a common cause of rapid loading.
Inspect the wood. A knot or pitch pocket may be feeding resin continuously.
Check the sander. Make sure the pad is flat, the abrasive is attached evenly, and dust extraction is not blocked.
Sand a clean section for comparison. If paper works normally away from the knot, the wood—not the tool—is probably the main cause.
If several fresh, clog-resistant sheets load within seconds across ordinary areas of the board, inspect the sander's pad and operating settings. Replace a worn or contaminated pad if appropriate for the tool. If the sander smells electrical, overheats, sparks, or runs abnormally, unplug it and follow the manufacturer’s service guidance; electrical repairs should be handled by a qualified professional.
When to replace the sandpaper or the wood
Replace sandpaper when its surface is shiny, packed with resin, torn, or no longer cuts with light pressure. Sandpaper is a consumable, and forcing a loaded sheet usually wastes time and can overheat the workpiece.
If a board has extensive pitch pockets, sticky resin throughout the surface, or resin that keeps bleeding after scraping, replacing the board may be more practical than trying to achieve a clean finish. For a valuable or finished piece, test any cleaning or sealing method on scrap first and confirm compatibility with the planned finish.
The main goal is to control heat: remove heavy pitch mechanically, use an appropriate fresh abrasive, sand lightly, and change paper before the resin has time to form a hard glaze.
FAQ
Why does sandpaper clog so quickly on pine?
Pine resin softens from sanding friction and fills the spaces between abrasive grains. Knots and pitch pockets are especially likely to cause immediate loading.
What grit should I use on pine pitch?
Use a grit appropriate to the amount of material you need to remove, usually starting coarser than the final finishing grit. Fine paper can clog quickly when used directly on a fresh pitch deposit.
Can I clean pine pitch from sandpaper?
Sometimes light dust can be removed with a compatible abrasive-cleaning accessory, but sticky pine pitch often makes the sheet uneconomical to save. Replace heavily glazed or contaminated paper.
Should I use more pressure to sand through pine pitch?
No. More pressure usually creates more heat and pushes softened resin deeper into the abrasive. Scrape raised pitch first, then use light pressure and keep the sander moving.
Can I seal pine pitch before sanding?
A compatible sealer may be appropriate for some finishing projects, but the resin pocket must be cleaned and the product must be compatible with the wood and final finish. Follow the sealer manufacturer's instructions and test on scrap first.