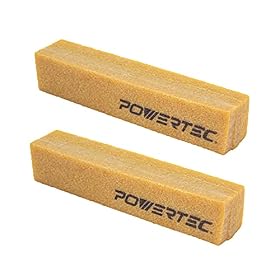
An abrasive cleaning stick can refresh sandpaper loaded with dust, resin, paint, or finish. Use it with the correct technique and replace the paper when the abrasive grains are worn or the backing is damaged.
Abrasive cleaning stick for loaded paper
An abrasive cleaning stick—often sold as a sandpaper cleaner, abrasive cleaning gum, or crepe-rubber stick—removes packed dust and finish from sandpaper. It can restore some cutting ability without replacing the paper, especially when the abrasive grains are still sharp and the problem is surface loading rather than wear.
What a cleaning stick does
During sanding, wood dust, paint, varnish, and other debris can clog the spaces between abrasive grains. This is called loading. Loaded paper may look shiny, smear the workpiece, produce more heat, or stop cutting efficiently even though the abrasive itself is not completely worn out.
A cleaning stick works by being drawn against the moving abrasive surface. Its material pulls or breaks loose debris from the paper, disc, belt, or sanding sponge surface.
It does not sharpen worn abrasive grains or repair:
Torn or delaminated backing
Missing abrasive coating
Burned or glazed areas
Creases that prevent flat contact
Sandpaper with a completely smooth cutting surface
How to use an abrasive cleaning stick
Stop the sander before inspecting the abrasive. Unplug corded tools or remove the battery when appropriate. For a stationary sander, follow the tool’s shutdown and guarding instructions.
Check the abrasive and tool. Look for tears, loose edges, exposed backing, melted spots, or damage around the disc, belt, or sheet.
Secure the workpiece and use the tool’s normal guard. Do not bypass guards or reach into a moving sanding area.
Start the sander according to the manufacturer’s instructions. Keep the cleaning stick away from fingers, loose clothing, and rotating parts.
Touch the stick lightly to the abrasive. Apply gradual, controlled pressure rather than forcing it into the belt or disc. Move across the loaded area if the tool and cleaning-stick instructions allow it.
Remove the loosened debris after the tool stops. Vacuuming is preferable to blowing dust into the air. Wear eye protection and suitable respiratory protection for the material being sanded.
Inspect the paper again. If it cuts cleanly and the abrasive surface remains intact, it may be ready for further use. If it is still glazed or no longer cuts, replace it.
Always follow the cleaning stick and sander manufacturer’s directions. Some products are intended for sanding belts or discs and may not be suitable for every abrasive, speed, or machine design.
Product prices and availability are accurate as of the date/time indicated and are subject to change. Any price and availability information displayed on Amazon.com at the time of purchase will apply to the purchase of this product.
When cleaning is worthwhile
A cleaning stick is most useful when the abrasive became clogged quickly while sanding resinous wood, painted surfaces, drywall compound, adhesive residue, or finishes. It can also help when a belt or disc still has visible abrasive grains but has a layer of compacted material covering them.
Cleaning is less useful when the paper has been used on hard material for a long time and the grains are blunt. In that case, removing the debris will not restore the original cutting performance.
Product prices and availability are accurate as of the date/time indicated and are subject to change. Any price and availability information displayed on Amazon.com at the time of purchase will apply to the purchase of this product.
Choose the right tool for the abrasive format
Sanding belts
A longer cleaning stick can be easier to control against a belt, but the size and shape must be compatible with the sander and the manufacturer’s procedure. Never place a hand near an exposed moving belt.
Sanding discs
For discs, use the cleaner only in a way that keeps your hands clear of the rotating surface. A disc that has lifted at the edge or lost its hook-and-loop or pressure-sensitive bond should be replaced rather than cleaned.
Sanding sheets and hand sanding paper
A cleaning stick is generally less convenient for loose sheets. For hand sanding, tapping the sheet against a clean surface or brushing away loose dust may help, but heavily loaded paper is usually inexpensive and practical to replace. Do not aggressively scrape the abrasive, since this can remove useful grains.
Sanding sponges
Abrasive sponges have a flexible surface and should be cleaned only as directed by their manufacturer. A rigid cleaning stick may damage the sponge or pull abrasive material from it.
Product prices and availability are accurate as of the date/time indicated and are subject to change. Any price and availability information displayed on Amazon.com at the time of purchase will apply to the purchase of this product.
Cleaning stick versus sandpaper replacement
Replace the abrasive when:
The surface is smooth even after loose debris is removed
Sanding takes noticeably longer or requires excessive pressure
The paper produces heat, burning, or repeated smearing
The backing is torn, curled, cracked, or separating
The disc or belt no longer stays securely attached
The abrasive is contaminated with material that cannot be removed safely
Using worn paper can waste time and overheat the workpiece. On a powered sander, excessive pressure can also strain the tool and make control more difficult. A cleaning stick is a way to extend usable abrasive life, not a substitute for fresh paper.
How to reduce loading
Use an abrasive intended for the material and finish being removed.
Let the abrasive do the cutting instead of pressing hard.
Keep the sander moving when working on wood or coatings.
Use dust collection where the tool and material permit it.
Empty or inspect the dust collector before airflow becomes restricted.
Avoid using a loaded disc or belt until debris has been removed.
Progress through suitable grits instead of asking a fine grit to remove heavy material.
Paint, lead-based coatings, and other hazardous finishes require additional precautions. If the coating’s age or composition is uncertain, follow applicable safety guidance and the coating or tool manufacturer’s instructions.
Bottom line
Buy an abrasive cleaning stick when your sandpaper is clogged but still has usable abrasive grains. Use light, controlled contact and keep clear of moving parts. If the abrasive is glazed, worn, damaged, or still cuts poorly after cleaning, replacement paper is the reasonable next step.
FAQ
What is an abrasive cleaning stick used for?
It removes packed dust, resin, paint, and finish from sanding belts, discs, and other compatible abrasives. This reduces loading and may restore cutting when the abrasive grains are still usable.
Can an abrasive cleaning stick restore worn-out sandpaper?
No. It can remove debris covering the abrasive, but it cannot replace blunt or missing abrasive grains, repair torn backing, or fix burned and glazed paper.
Can I use a cleaning stick on loose sandpaper sheets?
It may be possible, but it is usually less convenient and more likely to damage a loose sheet. Lightly remove surface dust or replace heavily loaded sheets instead, following the product instructions.
Is it safe to clean a sanding belt while the sander is running?
Only if the cleaning product and sander manufacturer specifically permit that procedure. Keep hands away from moving parts, use guards, wear eye protection, and stop and unplug the tool before inspecting or handling the abrasive.