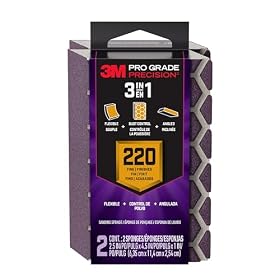
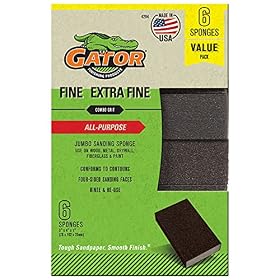
Fine sanding sponges are useful for smoothing primer, especially on profiles, edges, corners, and surfaces where a rigid sanding block can leave uneven scratches. Choose the grit based on how much leveling the primer needs, then use light pressure to avoid cutting through the coating.
Fine sanding sponges work well for smoothing primer before paint because they conform to small curves, edges, and surface irregularities. For most primer sanding, choose a fine or very fine sponge rather than an aggressive coarse grade. The right choice depends on whether you are leveling brush marks and dust nibs, preparing a previously smooth primed surface, or sanding between coats.
Choose the grit by the primer's condition
Use the least aggressive grit that will remove the problem without exposing the substrate.
Medium-fine grit: Useful when the primer has noticeable brush marks, roller texture, small runs, or uneven transitions that need leveling.
Fine grit: A general choice for smoothing a reasonably even primer coat before paint.
Very fine grit: Better for light between-coat sanding, removing minor dust particles, and refining a surface that is already smooth.
Grit ranges vary between manufacturers, so compare the stated grit on the package rather than relying only on labels such as “fine.” If you can still see ridges, runs, or rough patches, start with a moderately fine sponge and finish with a finer one. Starting too coarse can create scratches that remain visible under a thin topcoat.
When a sanding sponge is better than a sheet or block
A sponge is particularly useful when the primed surface includes:
Rounded edges and molded trim
Chair legs, cabinet profiles, and turned details
Inside corners and narrow recesses
Slightly uneven surfaces where a rigid block would sand only the high spots
Small repair areas that do not justify a power sander
For broad, flat panels, a sanding block or abrasive sheet can maintain a flatter surface. A flexible sponge may follow dips instead of leveling them, so it is not always the best option for correcting major unevenness.
Product prices and availability are accurate as of the date/time indicated and are subject to change. Any price and availability information displayed on Amazon.com at the time of purchase will apply to the purchase of this product.
Features that affect the purchase
Flexible or firm backing
A flexible sponge follows curves and profiles. A firmer sponge provides more control on flat areas and is less likely to fold over an edge. If one project includes both flat panels and detailed trim, a two-sided or multi-surface sponge can be more practical than using one very soft sponge everywhere.
Sponge shape
Rectangular sponges are versatile for general work. Narrow or contoured shapes can reach tight spaces, while angled edges help with corners and trim. Check the dimensions if you need to sand inside a narrow recess or between closely spaced profiles.
Abrasive type
Aluminum oxide is a common general-purpose abrasive for wood coatings and painted surfaces. Other abrasive materials may be selected for particular durability or finishing characteristics. Follow the product's stated applications, especially when sanding harder coatings or nonwood surfaces.
Dry- or wet-sanding suitability
Do not assume every sanding sponge is suitable for wet sanding. Use water only if the manufacturer identifies the sponge and the primer as compatible with wet sanding. When wet sanding, protect nearby materials from moisture and allow the surface to dry fully before applying paint.
Reusable and washable construction
Some sponges can be cleaned of loose dust and reused, while others are intended to be discarded as the abrasive wears. Washing does not restore worn abrasive. Replace a sponge when it stops cutting evenly, becomes clogged, or begins leaving inconsistent marks.
Product prices and availability are accurate as of the date/time indicated and are subject to change. Any price and availability information displayed on Amazon.com at the time of purchase will apply to the purchase of this product.
How to sand primer with a sponge
Let the primer dry and cure according to its label. A surface can feel dry while remaining soft underneath.
Remove loose dust and debris. Use a clean, dry cloth or vacuum suitable for fine dust.
Test in an inconspicuous area. Sand lightly and check whether the sponge removes the texture without cutting through the primer.
Use light, even pressure. Let the abrasive do the work. Excess pressure can flatten details, create low spots, or expose the material underneath.
Sand with controlled strokes. On flat areas, use overlapping strokes. On profiles, follow the shape instead of repeatedly rubbing one edge.
Check the surface under good lighting. Feel for roughness with your fingertips and look across the surface for remaining ridges or scratches.
Remove sanding dust before painting. Use the primer or paint manufacturer's recommended cleaning method and allow any moisture or cleaner to evaporate.
Avoid sanding through primer at corners and edges. These areas have less coating thickness and are easy to overwork. If bare wood, metal, or another substrate becomes exposed, remove the dust and spot-prime as directed by the coating manufacturer before applying the finish coat.
Product prices and availability are accurate as of the date/time indicated and are subject to change. Any price and availability information displayed on Amazon.com at the time of purchase will apply to the purchase of this product.
Common problems and fixes
The sponge clogs quickly
Primer may not be sufficiently dry, or the coating may be soft and gummy. Stop sanding, clean or replace the sponge, and wait longer before continuing. A coarser sponge is not necessarily the solution; it may simply clog more aggressively if the primer has not cured.
Scratches remain visible after sanding
The grit may be too coarse, the sponge may be worn or contaminated, or too much pressure may have been used. Finish with a finer sponge using light strokes, then remove dust and inspect the surface before painting.
The primer is being removed at the edges
Use less pressure and fewer passes near corners. A softer, flexible sponge can help on a rounded edge, but the best fix may be another thin primer coat if the edge has been sanded through.
The surface still feels uneven
A flexible sponge can follow low areas instead of leveling them. Use a firm sanding block on broad flat sections, or correct significant runs and ridges before the final fine-sanding step. Sanding alone may not fix a badly applied primer coat.
The sponge leaves inconsistent results
Check whether the abrasive is worn, loaded with dried coating, or being used on a contaminated surface. Replace it when cleaning no longer restores even cutting.
Product prices and availability are accurate as of the date/time indicated and are subject to change. Any price and availability information displayed on Amazon.com at the time of purchase will apply to the purchase of this product.
What to buy for primer sanding
For a general primer-preparation kit, look for:
A fine sponge for routine smoothing
A very fine sponge for light between-coat sanding
A firmer sponge or sanding block for flat areas
A contoured or narrow sponge if the project includes detailed trim
Buy based on the shapes and primer condition you actually have, not simply the largest assortment. A smaller selection of clearly labeled grits that can reach the work area is usually easier to control than a large set of nearly identical sponges.
If the primer repeatedly clogs abrasives, peels, remains soft beyond the stated drying time, or reveals adhesion problems, stop sanding and address the coating issue. Check the primer instructions and consider professional advice for uncertain compatibility, especially on older painted surfaces or materials that may contain hazardous coatings.
FAQ
What grit sanding sponge is best for primer?
A fine sanding sponge is a practical general choice for smoothing an even primer coat. Use a moderately fine grade for visible brush marks or texture, and a very fine grade for light between-coat sanding. Follow the grit and application guidance on the package because labels vary by manufacturer.
Can I use a sanding sponge between coats of primer?
Yes, a fine or very fine sanding sponge can smooth minor dust particles and surface roughness between coats. Make sure the primer is dry and sufficiently cured according to its label, and use light pressure so you do not remove too much coating.
Should primer be wet sanded with a sponge?
Only if the sanding sponge and primer manufacturer permit wet sanding. Many primer-sanding jobs are done dry. If wet sanding is approved, control moisture carefully and let the surface dry fully before painting.
Why does my sanding sponge clog with primer?
The primer may still be soft, the sponge may be worn, or the coating may be loading the abrasive. Wait longer for the primer to cure, clean or replace the sponge, and avoid heavy pressure.
Are sanding sponges better than sandpaper sheets for primer?
Sanding sponges are usually easier to control on curves, edges, corners, and profiles. Sheets or sanding blocks are often better for keeping broad flat surfaces level. Many projects benefit from using both formats.