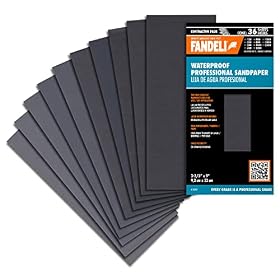
Best wet-dry paper for automotive-style finish work
The right wet-dry paper depends on whether you are leveling imperfections, refining scratches, or preparing a cured finish for polishing. Here is how to choose grit and paper format without creating deeper scratches than necessary.
Wet-dry paper for automotive-style finish work should be waterproof, consistent, and fine enough for the stage of the job. Silicon carbide paper is the usual choice for hand wet sanding because it cuts cleanly and produces a uniform scratch pattern when used with water. The best selection is not one grit for every task—it is a progression from a coarser grade for leveling to finer grades for refining before polish.
What to look for in wet-dry automotive sandpaper
Waterproof silicon carbide abrasive
Choose paper specifically labeled for wet or dry sanding. Waterproof paper has a backing and adhesive designed to resist water, while ordinary dry sandpaper can soften, shed abrasive, or fall apart when soaked.
Silicon carbide is commonly preferred for fine finish work because its sharp abrasive cuts efficiently and leaves a relatively consistent scratch pattern. Aluminum oxide paper can also be useful, particularly for dry sanding or more general-purpose work, but the product should be intended for the finish and grit range you need.
A flexible but durable backing
A flexible sheet follows gentle curves, but it should not fold over sharp edges while sanding. Thin paper is convenient for hand work in tight areas; a more durable backing is useful when sanding larger panels or using a sanding block.
For flat areas, use the paper with a firm, flexible block rather than pressing with your fingertips. Finger pressure can create uneven low spots and make the sanding pattern follow your hand instead of the panel.
Clearly graded grits
Grit numbers are not perfectly interchangeable between every abrasive standard or manufacturer. For that reason, buy a compatible progression from one product line when possible, and do not skip too many steps. A finer grit cannot always remove the deeper scratches left by a coarse grit efficiently.
Grit selection by finish stage
The suitable grit depends on the condition of the cured surface and how aggressively you need to remove material.
Coarser wet sanding: roughly 600 to 800 grit
These grits can help level dust nibs, orange peel, runs, or other surface irregularities in a cured coating. They remove material quickly enough to be useful, but they also create scratches that require several finer steps afterward.
Use them cautiously, especially on edges, body lines, and areas with uncertain film thickness. Avoid starting this coarse unless the defect actually requires it.
Intermediate refining: roughly 1000 to 1500 grit
This range is useful for refining the scratch pattern after leveling. Around 1000 grit may still be appropriate for substantial correction, while 1200- or 1500-grit paper is often used as a transition toward polishing.
The correct stopping point depends on the compound and polishing process that follows. If the surface will be polished by hand, continuing to a finer wet-sanding grade can reduce the effort required.
Fine finishing: roughly 2000 to 3000 grit
Fine wet sanding can prepare a cured clear coat or similar finish for compound and polish. These grades are better suited to removing or refining the marks from earlier sanding than to leveling a major defect.
Use light pressure and inspect frequently. A fine abrasive still removes finish, particularly on edges and raised details.
Very fine finishing: 4000 grit and higher
Very fine papers or finishing abrasives can reduce the amount of cutting required during polishing. They are most useful when the surface is already flat and the goal is to refine the scratch pattern rather than correct a defect.
Whether this step is worthwhile depends on the polishing system, pad, compound, and finish quality you need. It is not a substitute for correcting a defect with the appropriate earlier grit.
Product prices and availability are accurate as of the date/time indicated and are subject to change. Any price and availability information displayed on Amazon.com at the time of purchase will apply to the purchase of this product.
Wet sanding technique that reduces risk
Confirm that the coating is cured. Follow the paint, clear-coat, or finish manufacturer's cure instructions. Do not wet sand a coating that is still soft or chemically active.
Clean the surface and remove loose debris. A stray piece of grit can create a deep, isolated scratch.
Use clean water and a clean sanding surface. A small amount of appropriate soap can help lubricate the surface, but follow the coating manufacturer's guidance.
Soak or prepare the paper as directed. Some waterproof papers benefit from wetting before use; do not assume that every product requires the same preparation.
Use a sanding block on flat areas. Keep the block moving and use light, even pressure.
Sand in a controlled pattern. Changing direction between stages makes it easier to see whether the previous scratches have been removed.
Flush away slurry frequently. Wipe the panel clean and inspect it often rather than sanding by feel alone.
Stop before edges and body lines become thin. Masking or hand-sanding these areas separately may be safer than dragging a block across them.
Progress only when the scratch pattern is uniform. Moving to a finer grit while deeper marks remain usually leaves them behind for the polishing stage.
Wet sanding can expose primer, metal, or an underlying coating if too much material is removed. If you do not know the thickness or condition of the existing finish, use the least aggressive method first and consider professional advice for valuable or difficult-to-repair panels.
Product prices and availability are accurate as of the date/time indicated and are subject to change. Any price and availability information displayed on Amazon.com at the time of purchase will apply to the purchase of this product.
Wet sanding versus dry sanding
Wet sanding helps control dust and can keep the abrasive surface from loading as quickly. It is particularly useful for fine leveling and finish refinement. However, water can enter seams, electrical components, unsealed edges, or damaged substrates, so the work area must be suitable for wet methods.
Dry sanding is often more convenient for initial shaping, spot repair, or areas where moisture is undesirable. It also makes it easier to collect dust with appropriate equipment. Use the abrasive format and backing recommended for the tool or hand-sanding method, and wear suitable respiratory and eye protection.
Do not use water around energized electrical equipment, exposed connectors, or tools that are not rated for wet work. Follow the coating and tool manufacturer's instructions.
Sheet paper, blocks, and discs
Sheets for controlled hand sanding
Sheets are versatile and easy to cut into smaller pieces. They work well for panel edges, contours, and areas where a powered tool would remove too much material. Folded paper can be useful, but avoid sanding with a sharp folded edge because it can create narrow grooves.
Sanding blocks for flat panels
A block distributes pressure and helps prevent finger-shaped low spots. Choose a block that matches the panel's contour: a rigid block for truly flat areas and a flexible interface or conformable block for gentle curves.
Discs for larger areas
Discs can speed up larger jobs when paired with a compatible random-orbit sander and backing pad. Confirm the disc diameter, hole pattern, attachment style, and wet-or-dry rating before buying. Unless the tool and abrasive are explicitly designed for wet operation, keep water away from the sander.
Common buying mistakes
Starting with an unnecessarily coarse grit: This creates scratches that take longer to remove than the original defect.
Buying ordinary dry paper for wet sanding: It may delaminate or wear unpredictably.
Mixing incompatible grit progressions: Large jumps can leave scratches from the previous grade.
Using a bare hand on flat panels: Uneven pressure can distort the surface.
Using one small piece too long: Loaded or worn paper cuts inconsistently and can mar the finish.
Ignoring the polishing system: The final sanding grade should match the compound and pad that follow.
Sanding edges as aggressively as the center: Edges generally have less margin for material removal.
When to replace the paper or change the plan
Replace the sheet when it feels glazed, tears, sheds abrasive, stops cutting evenly, or carries particles that could scratch the surface. A fresh sheet is usually safer than increasing pressure on worn paper.
If a defect remains after the appropriate sanding progression, do not keep sanding indefinitely. The problem may be below the surface, the coating may be too thin, or the defect may require recoating rather than additional abrasion. Stop if you see a color change, primer, substrate, burn-through, or an edge becoming unusually sharp, and consult the finish or paint manufacturer—or a qualified automotive refinishing professional when the repair is beyond a controlled surface correction.
FAQ
What is the best grit to start with for automotive-style wet sanding?
Start with the finest grit likely to correct the defect. Fine surface refinement may begin around 1500 to 2000 grit, while a pronounced run, nib, or orange-peel defect may require a coarser step such as 600 to 1000 grit. Coarser grits remove material faster and require more refining afterward.
Is silicon carbide sandpaper good for wet sanding clear coat?
Yes. Waterproof silicon carbide paper is commonly used for fine wet sanding because it cuts efficiently and can produce a consistent scratch pattern. Use it only on a properly cured coating and progress through compatible grits.
Can I use regular sandpaper with water?
It is better to use paper specifically labeled waterproof or suitable for wet sanding. Ordinary dry sandpaper may soften, shed abrasive, or wear unevenly when soaked.
Should I use a sanding block when wet sanding a car panel?
Use a block on broad, relatively flat areas to distribute pressure and reduce finger-shaped low spots. A flexible or contour-matched block is more appropriate for gently curved panels, while edges and body lines require lighter, more controlled hand work.
When should I stop wet sanding and polish?
Stop when the surface is uniformly flat and the scratch pattern matches the polishing system you plan to use. Continuing to a finer grade can reduce polishing effort, but every additional pass removes more finish and increases the risk of burn-through.