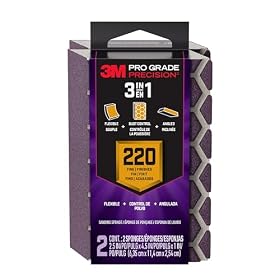
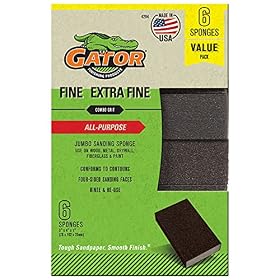
For most painted wood cabinets, use 180- or 220-grit sandpaper to dull the sheen and improve paint adhesion without creating deep scratches. Adjust the grit for the existing finish and cabinet material.
For most cabinets in good condition, the best grit for scuffing before paint is 180 or 220 grit. Use 180 grit when the existing finish is very glossy or slightly uneven, and 220 grit when you only need to dull the sheen before applying primer. The goal is to create a clean, uniformly dull surface—not to remove all of the old paint.
Choose the grit based on the cabinet surface
Painted or clear-coated wood
Start with 180 grit if the surface is glossy, has minor roughness, or needs light leveling. Follow with 220 grit if you want a smoother surface before primer.
If the existing paint is already dull and sound, 220 grit is usually sufficient for a light scuff.
Bare wood
Use 150 to 180 grit to smooth the wood, then finish with 180 or 220 grit. Avoid sanding so aggressively that you round over door edges or alter the profile of routed details.
MDF or fiberboard
Use 180 to 220 grit with light pressure. MDF edges can become fuzzy or uneven if over-sanded. Seal exposed MDF edges with the appropriate primer rather than trying to make them perfectly smooth through repeated sanding.
Laminate or thermofoil
Use 180 to 220 grit only as a light scuff. Do not sand through the thin decorative layer. A bonding primer designed for slick surfaces is especially important, and the primer manufacturer’s surface-preparation instructions take priority.
Why coarse sandpaper is usually the wrong choice
Very coarse paper, such as 60 or 80 grit, can leave scratches that remain visible through primer and paint. It is appropriate for removing heavy coatings or repairing significant damage, but it is usually excessive for ordinary cabinet repainting.
If the cabinet has peeling paint, deep scratches, swollen material, or multiple rough layers, begin only as aggressively as needed to remove the damaged material. Then move to a finer grit before priming.
Product prices and availability are accurate as of the date/time indicated and are subject to change. Any price and availability information displayed on Amazon.com at the time of purchase will apply to the purchase of this product.
How to scuff cabinets before painting
Remove hardware and clean the doors. Degreaser or a suitable cabinet cleaner is important because sanding can spread grease into the surface rather than remove it.
Let the surface dry completely. Moisture or cleaner residue can interfere with primer adhesion.
Sand with 180- or 220-grit paper. Use a sanding block or sanding sponge on broad, flat areas and hand-sand profiles carefully.
Use light, even pressure. Sand until the surface looks uniformly dull. Stop when the gloss is gone.
Vacuum and wipe away dust. Use a clean, lint-free cloth appropriate for the coating system. Avoid leaving dust in corners, around hinges, or along door edges.
Repair imperfections. Fill dents or unwanted holes with a compatible filler, let it dry, and sand the repair smooth.
Prime before painting. Choose a primer compatible with the cabinet material and existing coating. Slick laminate, stained wood, and surfaces with tannin or grease may need a specialized primer.
Product prices and availability are accurate as of the date/time indicated and are subject to change. Any price and availability information displayed on Amazon.com at the time of purchase will apply to the purchase of this product.
Sanding technique that prevents visible scratches
Sand flat panels with the grain when possible, especially on wood. Keep the abrasive moving and avoid concentrating pressure on corners and raised edges. A sanding sponge can conform to profiles, while a flat sanding block helps prevent finger-shaped depressions on wide panels.
Do not rely on sanding alone to solve adhesion problems. If the old finish is waxy, oily, peeling, or contaminated, cleaning and removing unstable material are more important than choosing a coarser grit.
Product prices and availability are accurate as of the date/time indicated and are subject to change. Any price and availability information displayed on Amazon.com at the time of purchase will apply to the purchase of this product.
When to use a different grit
120 to 150 grit: Removing heavier roughness, leveling filler, or preparing damaged wood before finer sanding.
180 grit: Scuffing a glossy painted surface or smoothing ordinary cabinet wood before primer.
220 grit: Lightly dulling a sound finish and smoothing the surface before primer or between primer coats.
320 grit or finer: Smoothing primer between coats when the primer instructions allow it; this is not normally needed for the initial cabinet scuff.
Always remove sanding dust before applying primer. Follow the primer and paint label for recommended sanding, cleaning, drying, and recoating procedures.
When sanding is not enough
If paint is peeling over a large area, the cabinet material is swollen, or the old coating may contain lead—especially in older homes—stop and use appropriate containment and professional guidance. Do not dry-sand potentially lead-based paint without following applicable safety requirements.
If the surface remains glossy after cleaning and light sanding, use a bonding primer rated for that substrate rather than repeatedly sanding until material is removed. Replace severely damaged hardware or panels when repairs would not produce a stable, smooth surface.
FAQ
Is 220 grit too fine for cabinets before painting?
No. 220 grit is appropriate for lightly scuffing a sound painted or clear-coated cabinet before primer. Use 180 grit first if the finish is very glossy or has minor roughness.
Do I need to sand cabinets before painting if I use primer?
Usually, yes. Cleaning and light sanding improve mechanical adhesion, while primer helps seal and bond the surface. A bonding primer does not eliminate the need to follow its preparation instructions.
What grit should I use between coats of cabinet paint?
If the paint or primer instructions permit sanding, a fine abrasive such as 320 grit may smooth dust nibs or minor roughness between coats. Sand lightly and remove all dust before recoating.
Should I sand cabinets down to bare wood?
Not for ordinary repainting. Sand enough to remove gloss, loose material, and surface imperfections. Sanding to bare wood is generally reserved for failing finishes, major repairs, or refinishing projects where the old coating must be removed.