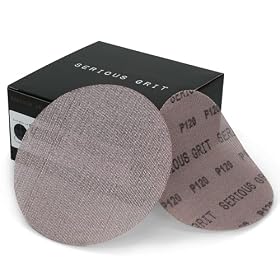
Best discs if your sander dust-extracts through the pad
The best sanding discs for a dust-extracting sander are the ones with a hole pattern that exactly matches the pad. From there, choose the grit and abrasive for your material, then decide between conventional paper discs and mesh discs.
If your sander pulls dust through the pad, choose discs with holes—or a mesh backing—that align with the pad’s extraction openings. The most important detail is not the disc brand; it is the correct diameter, attachment style, and hole pattern for your sander. A mismatched pattern can reduce suction, clog quickly, and leave more dust on the workpiece.
What to look for in dust-extracting sanding discs
Match the disc diameter
Start with the sander’s specified disc size, commonly measured in inches. A disc that is too small may expose the pad edge or fail to cover the sanding surface. One that is too large can overhang the pad and interfere with edge sanding.
Check the tool manual, pad label, or existing disc before buying. Do not rely on the abrasive disc’s appearance alone; discs with the same diameter can have different hole layouts.
Match the hole pattern exactly
Dust-extracting discs may have several holes, larger punched openings, or a full pattern of small perforations. The openings need to line up with the holes in the sanding pad so dust can travel into the dust bag, canister, or vacuum hose.
Common configurations include:
Multi-hole discs designed for a specific pad pattern
Discs with evenly spaced extraction holes
Universal-style discs with several possible hole positions
Mesh discs that allow airflow across much of the surface
A universal disc can be convenient, but it is not automatically the best choice. Compare its openings with the pad before purchasing. If most holes are covered, extraction performance may suffer.
Confirm the attachment method
Most random orbital sanding discs attach with hook-and-loop backing, while some sanders use pressure-sensitive adhesive discs. Buy the attachment type specified for your pad. Hook-and-loop discs should sit flat without lifting at the edge, and adhesive discs should not be applied over a dirty or damaged pad.
A worn hook-and-loop pad can cause discs to detach even when the disc is the correct size and hole pattern. If the hooks are flattened or clogged with dust, replacing the pad may solve the problem better than changing disc brands.
Conventional discs versus mesh discs
Conventional perforated paper discs
Perforated paper discs are often the straightforward choice when you know your sander’s hole pattern. They are available in many grits and can be cost-effective for general wood sanding.
Their main limitation is clogging. Paint, finish, resinous wood, and soft materials can pack the abrasive surface, especially when using a fine grit or applying too much pressure. A disc that clogs stops cutting efficiently and can leave uneven scratches.
Mesh sanding discs
Mesh discs use an abrasive-coated mesh backing rather than a solid paper surface. Because air and dust can pass through much of the disc, they may provide more consistent extraction and resist loading better in some applications.
Mesh discs still need to match the sander’s diameter and attachment system. They may also work best when used with a functioning vacuum or dust extractor, since their open structure is intended to move dust through the sanding surface.
Mesh discs can be a useful choice for drywall compound, primer, paint, and other materials that load ordinary discs quickly. For heavy stock removal on rough wood, choose a mesh disc only if its manufacturer lists it for that use.
Product prices and availability are accurate as of the date/time indicated and are subject to change. Any price and availability information displayed on Amazon.com at the time of purchase will apply to the purchase of this product.
Choose the grit for the job
The hole pattern controls dust flow, but grit controls how aggressively the disc cuts.
Coarse grits: Remove material, level uneven areas, and strip finishes. They leave deeper scratches and require follow-up sanding.
Medium grits: Refine coarse scratches, smooth rough wood, and prepare many surfaces for a finer pass.
Fine grits: Smooth the surface before paint or finish and reduce visible sanding marks.
Very fine grits: Used for finish preparation or between-coat work when the coating manufacturer allows sanding.
Avoid jumping from a very coarse disc directly to a fine disc. Each grit should remove the scratches left by the previous one. The exact sequence depends on the wood, coating, and desired finish.
For painted surfaces, use enough grit to level or abrade the coating without unnecessarily cutting into the substrate. When sanding bare wood, finish with the grit recommended for the stain, paint, or clear finish you plan to apply.
Product prices and availability are accurate as of the date/time indicated and are subject to change. Any price and availability information displayed on Amazon.com at the time of purchase will apply to the purchase of this product.
Abrasive types that affect disc choice
Aluminum oxide
Aluminum oxide is a common general-purpose abrasive for wood and many household refinishing tasks. It is often a practical choice for routine sanding where low cost and broad availability matter.
Ceramic abrasive
Ceramic abrasives are commonly selected for more aggressive cutting and demanding sanding. They may be useful for removing material or working with harder surfaces, but the disc must still be appropriate for the material and sander.
Silicon carbide
Silicon carbide is often used for fine finishing and some wet-or-dry applications. Do not wet-sand unless the disc, sander, and workpiece are specifically suitable for it. Most powered sanders should not be exposed to water unless the manufacturer expressly permits that use.
Stearated or anti-loading coatings
Some discs have a coating intended to reduce clogging. These can help with paint, primer, and other materials that tend to load the abrasive. They are not a substitute for dust extraction, light pressure, and choosing the right grit.
How to get better dust extraction
Even a correctly matched disc can produce poor dust collection if the rest of the setup is compromised.
Inspect the disc holes. Make sure they are not covered by the pad or blocked by sanding debris.
Check the pad. Clean clogged holes and replace a pad that is warped, torn, or missing hook-and-loop material.
Use light, even pressure. Pressing hard can flatten the disc against the workpiece and restrict airflow while also slowing the abrasive.
Empty the dust container. A full bag, canister, or clogged filter can reduce airflow.
Inspect the hose and connection. Look for kinks, packed dust, loose fittings, and a blocked adapter.
Keep the workpiece and pad flat. Tilting the sander can reduce contact between the disc holes and the pad openings.
Replace loaded discs. A clogged disc may continue to sand poorly even if extraction is working.
For fine dust, connect the sander to a compatible vacuum or dust extractor when possible. Wear appropriate respiratory and eye protection, and follow the sander, vacuum, abrasive, and coating manufacturer’s safety instructions. Dust from old paint, treated wood, masonry, or unknown coatings may require additional controls; stop and identify the material before sanding.
Which discs make the most sense?
For ordinary bare-wood sanding: Choose perforated aluminum oxide discs that match the pad exactly.
For paint, primer, or clog-prone materials: Consider anti-loading discs or mesh discs, using a suitable grit and light pressure.
For frequent vacuum sanding: Prioritize an open hole pattern or mesh construction that aligns well with the pad and vacuum adapter.
For heavy material removal: Use a coarse disc rated for the sander and workpiece, then change to progressively finer grits.
For finishing and between-coat work: Use a fine or very fine disc only after the surface is already reasonably smooth.
The best purchase is usually a multipack or grit assortment only when every disc uses the correct hole pattern. A large assortment of incompatible discs is less useful than a smaller supply that fits the pad and suits the material.
When to replace the pad or sander
Replace the sanding pad if discs will not stay attached, the pad is visibly distorted, or its extraction holes remain blocked after cleaning. Replace discs when the abrasive is worn, glazed, torn, or loaded with finish.
If extraction remains weak after checking the disc, pad, hose, filter, container, and vacuum connection, inspect the sander according to its manual. Unusual motor noise, burning smells, intermittent power, damaged cords, or overheating are reasons to stop using the tool and seek qualified service or replacement rather than continuing to troubleshoot electrically.
FAQ
Do sanding discs need holes for a sander with dust extraction?
Usually, yes. The holes or open mesh allow dust to travel through the pad into the dust bag or vacuum. The disc’s hole pattern must align with the sander pad; simply using a disc with holes is not enough.
Are mesh sanding discs better for dust collection?
They can provide more open airflow and may resist clogging better than solid paper discs, especially on paint, primer, or drywall compound. They still need the correct diameter and attachment system, and they work best with a clear extraction path.
Can I use a disc with a different hole pattern?
It may attach physically, but covered or misaligned holes can significantly reduce dust extraction. Use a matching pattern or a disc specifically designed as universal for your pad.
Why is my dust-extracting sander still making a mess?
Check the disc and pad holes first, then inspect the hose, adapter, filter, and dust container. Also check for excessive sanding pressure, a loaded disc, a damaged pad, or a vacuum that is not moving enough air.