A sanding disc can be ready for replacement even when its surface still looks clean. If it cuts slowly, leaves uneven marks, or has damaged abrasive or backing, stop and inspect it. A quick check on scrap wood can help distinguish a worn disc from one that is merely clogged or mounted incorrectly.
Technique · Sat Sep 19
When to replace a disc that still looks unused
A sanding disc can be worn out or unsafe before it looks used. Check its cut on scrap, inspect the abrasive and backing, and replace it if cleaning does not restore performance.
Check whether the disc still cuts
With the sander off and unplugged or its battery removed, take the disc off and inspect it. Then, if it appears intact, fit it securely and make a brief test on scrap material using light, even pressure. Keep the sander flat and let the abrasive do the work.
Replace the disc if it removes material much more slowly than a fresh disc of the same grit, requires extra pressure, or leaves inconsistent scratches. The disc may still look unused because wear can be hard to see, especially on fine grits. Do not press harder to compensate; that can overheat the workpiece, damage the finish, or put extra strain on the sander.
Replacement discs for the reader’s sanding job
 52 Pack 5 Inch 8-Hole Hook and Loop Sanding Discs Sandpaper Red Round 60 80…NOOKEYA
$6.25 as of
View on Amazon POTUINOM 165 PCS 5 Inch Sanding Discs Random Orbital Sander SandpaperPOTUINOM
$19.99 as of
View on Amazon 5 inch DeWalt DWE6423/6423K, DWE6421/6421K, DCW210B Random Orbital Sander Replacement Pad with 5 inch 8…NYXCL
$18.95 as of
View on Amazon
Product prices and availability are accurate as of the date/time indicated and are subject to change. Any price and availability information displayed on Amazon.com at the time of purchase will apply to the purchase of this product.
Look for damage to the abrasive or backing
Replace the disc if you find any of these problems:
- Missing or loose abrasive grains: Bare patches or grains that rub off easily reduce cutting and can leave an uneven finish.
- Tears, cracks, or frayed edges: Damaged discs may tear further or sand unevenly while spinning.
- A warped or badly creased disc: It may not sit flat against the sanding pad.
- A damaged attachment surface: Hook-and-loop backing that no longer holds, or a worn adhesive layer on a pressure-sensitive disc, can let the disc shift or detach.
- Heat or contamination damage: Burnt, melted, oily, or heavily paint-covered areas may keep the disc from cutting cleanly.
A little discoloration alone does not always mean the disc is spent. Judge it by its condition and how it performs on the material, rather than appearance alone.
A cleaning option for reusable, intact discs
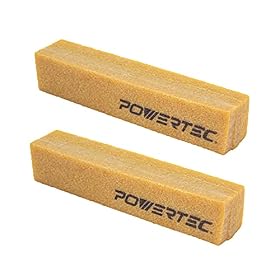 POWERTEC 71002-P2 Abrasive Cleaning Stick for Sanding Belts & Discs 8-1/2" 2PK | Natural Rubber…POWERTEC
$15.99 as of
View on Amazon 1-1/2 x 1-1/2 x 8" Inch Abrasive Cleaning Eraser Stick - Ideal for Revitalizing Abrasive…TPmax
$7.99 as of
View on Amazon 8" x 1-1/2" x 1-1/2" Abrasive Cleaning Eraser Stick for Sanding Belts Sanding Discs Paper…makiwork
$8.99 as of
View on Amazon
Product prices and availability are accurate as of the date/time indicated and are subject to change. Any price and availability information displayed on Amazon.com at the time of purchase will apply to the purchase of this product.
Try cleaning a clogged disc first
A disc that looks smooth or dusty may be loaded with wood fibers, paint, or finish instead of worn out. If the abrasive and backing are intact, try cleaning it using a method approved by the disc and sander manufacturers. Some abrasives can be cleaned with a sanding-disc cleaning stick; others may be unsuitable for that method.
Turn off and disconnect the sander before removing or cleaning the disc. Do not clean a disc while it is spinning, and do not use water or solvents unless the manufacturer permits them. If cleaning does not restore cutting, or the abrasive is worn or damaged, replace the disc.
Rule out a setup problem
Before discarding a nearly new disc, check that it matches the sander’s pad size and attachment type. For a disc with dust-extraction holes, align the holes with the pad if the sander requires it. Make sure the disc is centered, seated flat, and held securely.
Also check that the disc’s grit suits the job. A fine grit may remove material slowly by design; it is not necessarily worn out. If a disc that previously cut well suddenly performs poorly, check for loading, a loose fit, or a mismatch between the disc and the task before assuming it has reached the end of its life.
When replacement is the sensible choice
Replace a disc when it is damaged, will not stay attached, has contaminated or missing abrasive, or continues to cut poorly after an appropriate cleaning and setup check. For a disc that looks intact but seems ineffective, compare it with a fresh disc of the same grit on scrap material. If the fresh disc cuts more evenly with light pressure, retire the old one.
There is no universal number of minutes or projects that determines disc life. Material, grit, pressure, dust extraction, and the abrasive type all affect wear. Inspect discs regularly and follow the sander and abrasive manufacturers’ instructions. Wear appropriate eye and respiratory protection when sanding.
FAQ
Can a sanding disc look new but be worn out?
Yes. Abrasive grains can become dull without obvious visual damage, particularly on fine-grit discs. A short comparison on scrap material can reveal whether it still cuts effectively.
Can I keep using a sanding disc with paint or dust stuck to it?
If the disc is intact, try a cleaning method approved by its manufacturer. Replace it if it remains clogged, cuts unevenly, or has damaged abrasive or backing.
How can I tell whether a disc is clogged or worn?
A clogged disc may improve after approved cleaning. A worn disc usually continues to cut slowly or unevenly after cleaning and correct installation.
Is it safe to reuse a disc that does not stay attached to the sander?
No. A disc that will not remain securely attached can shift or come loose. Check for a damaged disc or sanding pad, and replace the part that is no longer holding securely.