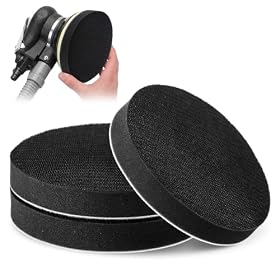
A foam interface pad adds a flexible layer between a sanding disc and backing pad, helping the abrasive follow curved or contoured surfaces with less risk of flat spots.
Foam interface pad for curved work
A foam interface pad is a flexible cushion that fits between a hook-and-loop sanding disc and the sander’s backing pad. It helps the abrasive conform to curved, rounded, or lightly contoured surfaces instead of cutting mainly with the hard edge of the backing pad.
Choose one that matches your disc diameter, attachment system, and sander backing pad. Thickness also affects the result: thinner pads provide modest flexibility and control, while thicker pads conform more easily but can feel less stable.
What an interface pad does
The pad creates a compliant layer between the rigid tool backing pad and the abrasive disc. This can help when sanding:
Rounded furniture edges
Curved cabinet parts
Automotive body contours
Molded panels and plastic surfaces
Slightly uneven or transitioning surfaces
Areas where a rigid pad could leave flat spots
An interface pad is not a replacement for the abrasive. You still need a compatible sanding disc in the appropriate grit for the material and finish.
It also does not turn a random-orbit sander into a detail sander. Tight inside corners, deep profiles, and sharply sculpted areas may still require hand sanding, a sanding sponge, or a smaller tool.
How to choose the right foam interface pad
Match the diameter
The interface pad should match the diameter of the sanding disc and the sander’s backing pad. A mismatch can leave part of the abrasive unsupported, reduce control, or allow the disc to overhang and catch on an edge.
Check the measurement of the backing pad and buy discs and interface pads for that same size. Do not assume that discs described as “universal” fit every sander; verify the stated diameter before ordering.
Match the attachment style
Most interface pads for random-orbit sanding are designed to sit between hook-and-loop surfaces. The side facing the tool must attach securely to the backing pad, and the opposite side must hold the sanding disc.
Before buying, confirm:
The pad uses the same hook-and-loop system as the disc and backing pad.
The hook-and-loop faces are oriented correctly.
The pad does not require adhesive, a pressure-sensitive backing, or a proprietary mounting system.
The sander’s pad has enough usable hook-and-loop surface to support the added layer.
Avoid placing an interface pad under a disc that is designed for adhesive attachment unless the manufacturer specifically allows that setup.
Choose thickness based on the curve
Thickness affects how much the pad can flex and how directly you can control the tool.
Thin foam: Better for gentle curves, edges, and situations where you want to preserve control and sanding pressure.
Medium foam: A practical general-purpose choice for moderate contours and transitions.
Thicker foam: Better suited to more pronounced curves, but it may feel softer and less precise, especially when sanding near an edge.
More flexibility is not always better. On a mostly flat panel, an overly thick pad can make the sander feel unstable and may make it harder to keep the abrasive evenly engaged.
Consider foam firmness
Foam firmness determines how readily the pad compresses. A softer pad conforms more easily, while a firmer pad provides more predictable support on flatter or gently curved work.
Manufacturers may describe firmness with their own terminology, so compare the intended use and product instructions rather than relying only on labels such as “soft” or “medium.”
Check the disc and dust-hole pattern
An interface pad must not block the dust-extraction holes in a way that prevents the sanding disc from working properly. Some pads have matching perforations; others are intended for solid discs or specific hole patterns.
If you use a vacuum, inspect the assembled pad and disc before sanding. The holes should line up as intended, and the disc should sit flat without wrinkles or unsupported sections.
Product prices and availability are accurate as of the date/time indicated and are subject to change. Any price and availability information displayed on Amazon.com at the time of purchase will apply to the purchase of this product.
When an interface pad is useful
An interface pad makes the most sense when a standard rigid backing pad is too aggressive on a contour but a hand sanding block would be slower or less consistent.
It can be especially helpful for blending a repair into a curved panel or sanding a surface that changes gradually from flat to rounded. Use light, even pressure and keep the tool moving. Pressing hard can compress the foam, reduce its ability to conform, and create uneven sanding.
For sharp edges or narrow profiles, use caution. The flexible layer can make it easier for the disc edge to roll over an edge, remove too much material, or damage adjacent surfaces. Mask nearby areas when appropriate and use a lower-speed setting if the sander and abrasive manufacturer permit speed adjustment.
Product prices and availability are accurate as of the date/time indicated and are subject to change. Any price and availability information displayed on Amazon.com at the time of purchase will apply to the purchase of this product.
When you may not need one
You may not need an interface pad for:
Broad, flat panels
Heavy stock removal where firm support is preferable
Very small details that require a detail sander
Deep curves that need a shaped hand tool
Work where the backing pad or abrasive manufacturer prohibits an added layer
A sanding sponge or shaped sanding block may provide better control on small curves, inside corners, and hand-finished edges.
How to use a foam interface pad
Disconnect or switch off the sander before installing the pad.
Clean loose dust from the backing pad and the hook-and-loop surfaces.
Center the interface pad on the backing pad.
Press the pad evenly into place without stretching or folding it.
Attach the sanding disc, aligning its edges and dust holes.
Check that the disc is fully supported and lies flat.
Start the tool away from the workpiece, if the manufacturer’s instructions allow, and listen for abnormal vibration.
Sand with light pressure and keep the tool moving across the curve.
Stop if the disc shifts, the foam bunches, or vibration increases.
Follow the sander, interface-pad, and abrasive manufacturers’ instructions when they differ. Disconnect power before changing accessories, and wear suitable eye, hearing, and respiratory protection for the material and dust being produced.
Common fit and performance problems
The disc will not stay attached
Clean dust from the hook-and-loop surfaces and check that the disc and interface pad use compatible attachment systems. A worn backing pad, damaged hooks, or compressed foam can also reduce grip. Replace the worn component rather than relying on excessive pressure.
The sander vibrates
Remove the disc and reinstall the interface pad so it is centered. Check for a folded edge, debris, a warped disc, or a backing pad that is damaged. Do not continue using the tool if vibration remains after the accessory is correctly installed.
Sanding becomes uneven
Use less pressure and keep the sander moving. A pad that is too soft or too thick may allow excessive compression, particularly on flatter surfaces. Try a thinner or firmer interface pad, or remove the pad if the surface does not need additional compliance.
Dust extraction is poor
Check that the interface pad and disc holes align with the backing pad. A solid interface pad may restrict airflow with a perforated disc, depending on the design. Use the hole pattern and extraction arrangement specified by the accessory manufacturer.
Bottom line
Buy a foam interface pad when you need a sanding disc to follow gentle or moderate curves more closely than a rigid backing pad can. Match the diameter and attachment system first, then choose thickness and firmness based on how much flexibility the work requires. For flat surfaces, heavy removal, sharp details, or deep profiles, a standard backing pad or hand-sanding accessory may provide better control.
FAQ
Can I use a foam interface pad with any sanding disc?
Usually, it is intended for hook-and-loop sanding discs and a compatible hook-and-loop backing pad. Check the attachment type, diameter, and dust-hole pattern before use. Do not assume it works with adhesive-backed discs.
Does a thicker interface pad make sanding curves easier?
A thicker pad generally conforms more readily to pronounced curves, but it can feel less stable and less precise on flatter areas. Choose the least thickness that provides the flexibility you need.
Can an interface pad prevent sanding flat spots?
It can reduce the risk on gently curved surfaces by allowing the abrasive to follow the contour. It cannot prevent damage if excessive pressure, an unsuitable grit, or poor tool control is used.
Why is my sander vibrating after I add an interface pad?
The pad or disc may be off-center, folded, damaged, or contaminated with dust. Remove and reinstall the accessories, check that the disc lies flat, and stop using the tool if vibration continues.